While preparing for our trip to take Addisyn to New Orleans for a visit to the Children's Hospital, I realized I was short on small bags for shampoo, makeup and etc. Anyways before I get into the crafty stuff I wanted to share. This is Natalie sleeping in her "tent" last night (She insist in sleeping in just her undies crazy kiddo!)
Here are my Kiddos this morning...they hate wearing clothes lol!
Anyways on to the craft stuff here is a finished photo of my bags
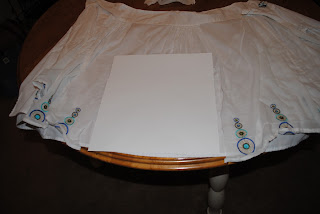
So first I had these two skirts that I never wore...One I bought for a few dollars at a thrift store! I made a pattern with two pieces of paper...the paper was about as wide as I wanted and I needed about 1 1/2 pieces so it would be as long(or deep) as I wanted. So here is my paper
So I cut my skirt up the back and along the zipper to open it up flat(you can do this or use any other fabric). I placed my pattern on the skirt and cut both layers about 1/4in gap around the paper
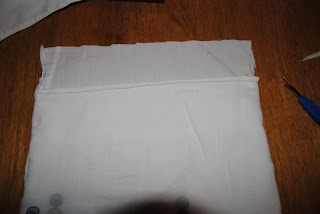
So cut two of these...then you are going to place them together...the first one I did I messed it up and I'm not really sure how. The second one I made sure I put the sides that I wanted on the outside together and the other on the out. Pin together and sew. Make sure you don't sew all the way to the top I left a few inches on each side
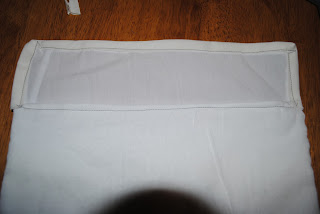
I folded the front piece down and sewed leaving a flap on the top. I then trimmed the excess. Because the way the fabric was I decided to use some bias tape I had on hand to finish the top.
Next I added Kam Snaps. I already had these from a previous project (cup clips) so I added those. You could adjust and add a zipper or keep it like this and sew in Velcro.
Enjoy your cute new bags...Don't you just love new bags??
I may be MIA for a while...but that just means I will have more ideas when I get back!
Sunday, December 12, 2010
Tuesday, December 7, 2010
Reindeer Cookies!
Are these not so cute? I got the idea from a friend of mine, she makes such cute little desserts! I thought this would be such a neat little project for Natalie. I mean it's that time of the year so she was excited!
Doesn't she look like she is having so much fun? So here's the recipe. The cookies are oatmeal chocolate chip.
1 cup butter,softened 1 3/4 cups all purpose flour
1 1/4cup packed brown sugar 1 teaspoon baking soda
1/2cup white sugar 2 1/2 cups rolled oats
2eggs 2 cups semi sweet chocolate chip
2 tablespoons milk 1 cup chopped walnuts
1 teaspoon vanilla extract (I added a 1/2cup of chocolate chips instead of the walnuts)
Preheat oven to 375 degrees F
Beat together butter and sugars until creamy. Add eggs,milk and vanilla:beat well. Add combined flour,baking powder and salt; mix well. Stir in oats, chocolate chips and nuts; mix well
Drop rounded tablespoonful onto ungreased cookie sheet. Baked 9-10min. Cool for 1 min on cookie sheet; remove to wire rack.
Have you gotten out your ingredients yet?
You also need m&m's,chocolate icing and a piping bag or you could use a zip lock bag and cut a small corner off. Yummy cookie dough, don't eat too much it will give you a tummy ache!
So are your cookies baked and cooled? Are you ready to decorate? Now its time to put the chocolate icing in you bag of choice. First make you antlers
Now you eyes...my bag of m&m's had 1 brown in it so my eyes ended up being made out of the frosting and well Natalie put m&m's everywhere!
Now add your red nose or let the kiddos go crazy with the m&ms I know Natalie made an alien reindeer. She said it was the best kind!
Have fun and make a mess!!
Monday, December 6, 2010
Pleated Shirt Dress
All of you guys on FB like my girls' little Christmas Dresses? If you missed them here is Addisyn looking so sweet in hers
And Ms Natalie adored hers
Oh and don't forget it is a "twirly" dress. Nat found that out fast!
Wanna make one? They are easy and sooo cute!
First you will need a t-shirt(long or short sleeved will work) Mine was long but I cute the sleeves out
Sew both ends of the fabric together. If you have a printed fabric place the print sides together so when you flip it your prints are on the outside. Once you sew the ends together, trim the excess and use the zigzag stitch to help keep from fraying.
Next you are going to fold the top down 1/4in and pin around
Next fold that down another 1/4in and stitch all the way around
After you have stitched this fold down 1 1/2in and iron flat
Next you are going to make you pleats
Make sure they are even along the top
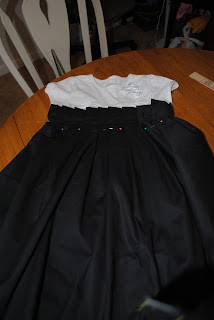
Make pleats all the way around the skirt. Make sure that the skirt is not to wide or too small to the shirt(look at the photo below) Stitch about 1 1/2in down from the top of the pleats all the way around. Addisyns I stitched too close to the top and Natalies I stitched about 2in down and it kept flopping so I had to make small stitches on the pleats to the shirt.
Now Cute the shirt you want to leave about 3 inches below where you plan to sew(hang on to the piece on of these days I'll teach you to make a skirt for your little girl with it!Once cut pin the skirt to the shirt all the way around
Sew along the same line you used to sew the pleats. Now time to make you sash. Mine was about 72inche long and 5inches wide. I had to sew two pieces of fabric together. So make a tube and sew. Turn it inside out. Place it on the front and line the top up with the stitch you just placed. Sew across that from side to side(not all the way around) Sew on the bottom of the sash from side to side also. Make sure the ends are even...clip if you need to then tuck in the ends and sew. Your almost done. Place on your little girl hem as needed!
And Ms Natalie adored hers
Oh and don't forget it is a "twirly" dress. Nat found that out fast!
Wanna make one? They are easy and sooo cute!
First you will need a t-shirt(long or short sleeved will work) Mine was long but I cute the sleeves out
You want to measure the shirt across right under the arms,take that number and times it by three. For example Addisyns was 12in wide so I had 36in(don't worry if yours is more or less just use that math) I then measured her from her lower breast bone to below her knees, Go a little longer if you question it, you can always hem it later. Add 4 inches to that for seem allowance. Addisyns was 14inches long so I added four inches making it 18inches. Cut the fabric of your choice so mine was 36inches wide and 18inches long.
Next you are going to fold the top down 1/4in and pin around
Next fold that down another 1/4in and stitch all the way around
After you have stitched this fold down 1 1/2in and iron flat
Next you are going to make you pleats
Make sure they are even along the top
Make pleats all the way around the skirt. Make sure that the skirt is not to wide or too small to the shirt(look at the photo below) Stitch about 1 1/2in down from the top of the pleats all the way around. Addisyns I stitched too close to the top and Natalies I stitched about 2in down and it kept flopping so I had to make small stitches on the pleats to the shirt.
Now Cute the shirt you want to leave about 3 inches below where you plan to sew(hang on to the piece on of these days I'll teach you to make a skirt for your little girl with it!Once cut pin the skirt to the shirt all the way around
Sew along the same line you used to sew the pleats. Now time to make you sash. Mine was about 72inche long and 5inches wide. I had to sew two pieces of fabric together. So make a tube and sew. Turn it inside out. Place it on the front and line the top up with the stitch you just placed. Sew across that from side to side(not all the way around) Sew on the bottom of the sash from side to side also. Make sure the ends are even...clip if you need to then tuck in the ends and sew. Your almost done. Place on your little girl hem as needed!
Tuesday, October 26, 2010
I've lost it!
You thought I lost my mind huh? Well maybe but that is not what I am referring to. I have lost the idea I had yesterday about what I was going to blog about...oh well I guess it was not that important. Well so far today I have had PWOC(Protestant Women of the Church) and we were suppose to have ballet but AE has another cough in which needs to be checked out...might I add I think La is the source of all germs ick! So our PWOC is doing shoe boxes for Samaritans Purse. We saw a video which of course there were parts of Boone in (yay Go App I miss home) which was nice to see. I think I am going to take Nat to do a shoe box of her own. We are on a mission this Christmas to leave the hustle and bustle and over gift giving and really focusing on the meaning. Anyways in all this I am guessing they will be driving the filled boxes to Boone....wonder if I can hitch a ride!
So I got another cloth diaper in the mail yesterday. It is a pocket diaper made by a work at home mommy. For you guys who do not know anything about cloth diapering(which I was so clueless) this is a diaper that has a pocket ( I thought it was literally like a hole in the diaper to which they peed...I know weird mind) basically if you look at a diaper...any diaper imagine at the back there is a opening between the outside and the inside of the diaper. It normally is about as wide as the diaper and as long. This is where you put inserts which kinda look like cloth maxi pads just thicker which absorbs the fluid! There you have it folks your first cloth diaper lesson. We put it on AE this morning and worked well and oh so cute I was going to include a picture but blogger.com doesn't like me today!
So since I can not add a picture I am going to put up a recipe! This is by far my favorite potato soup!
4-1/2 bacon strips, diced
1-1/2 small onion, chopped
1-1/2 cloves garlic, minced
1/4 cup and 1 teaspoon all-purpose flour
1-1/2 teaspoons salt
1-1/2 teaspoons dried basil
3/4 teaspoon pepper
4-1/2 cups chicken broth
1/4 cornstarch dissolved in cold water according to package direction
6 large potatoes, peeled and cubed
1-1/2 cups half-and-half cream
Shredded Cheddar cheese
So I got another cloth diaper in the mail yesterday. It is a pocket diaper made by a work at home mommy. For you guys who do not know anything about cloth diapering(which I was so clueless) this is a diaper that has a pocket ( I thought it was literally like a hole in the diaper to which they peed...I know weird mind) basically if you look at a diaper...any diaper imagine at the back there is a opening between the outside and the inside of the diaper. It normally is about as wide as the diaper and as long. This is where you put inserts which kinda look like cloth maxi pads just thicker which absorbs the fluid! There you have it folks your first cloth diaper lesson. We put it on AE this morning and worked well and oh so cute I was going to include a picture but blogger.com doesn't like me today!
So since I can not add a picture I am going to put up a recipe! This is by far my favorite potato soup!
Green onion the green part diced
Place all in a crock pot minus the bacon, cheese and Green onion. plus 1 tbsp bacon drippings cook on low for 8-10hrs or high on 6-4hrs. Top with bacon,cheese and onion!
I hope you all have a wonderful day...its almost Halloween...which means I can sneak the chocolate out of the kiddos bags!
Monday, October 25, 2010
Thrown into Mondays
Who doesn't love a Monday....well up until Natalie started this year of school and dance each day was the same to me...I just had a extra person to care for Saturday and Sunday. So a Monday was just another day...not now! You have lazy Sunday right? Go to church do lunch and relax maybe get a little bit done for the upcoming week. Well I now get thrown into Monday like the rice chex my lovely AE crushed on my floor this morning! We have school bus, then wait in the car pick up line for a min of a hour. A hour(mind you that is a min) because if I do not get there to be first (or close to it) in line, Natalie does not make it to tap in time! Lets just say AE is not fond of a not moving car...ugh!
On an another who knew so much snot could come out of such a small being and nose. Thank goodness it is not my kid...it is however a child I am watching today! I love children, I really do and I can definitely keep friends children here and there no problem...but kudos to the FCC(women who set up at home day cares on post) or any daycare provider and teacher for that matter. You are brave souls!
So we(me) have decided to switch AE to cloth diapers. Yay! Any of you who have never used cloth or did when say you child was little who is now 10 and older you would be shocked in the cloth diaper community. I was! You can but you do not have to use the old school prefolds, pins and covers. We have only received one in the mail a super cute BumGenius 4.0 and have used it twice. The first time I was truly impressed with this diapers holding capability. It would have held more if we had stuffed it with more inserts! Anyways I think its nap time for the monsters! Off to another busy day!
Sunday, October 24, 2010
Just because I needed something else to do!
Why not avoid house work like the plaque? I feel that way most days...oh well. I thought I would give this a go, since we have family and friends all over who we do not get to talk with on a regular bases. So as many of you know we are a Army family, we have been enjoying this ride since 2007. With two duty stations under our belt we are ready for number 3! We have two daughters, Natalie(4) and Addisyn(1) who keep me pretty busy. Especially Ms Natalie...she is a very high strung kid. The stories I have of that one! yikes. We have a dog, Jackson Blue, who we adopted at Ft. Lewis. Amazing dog...he's old and stubborn none the less but loyal and great with the kids. He has to be...he eats from under AE's(Addisyn's) highchair and normally steals what Nat leaves on the plate after she leaves the table and forgets to put the dish away! We also have a cat....Rosalie Pretty Daisy...do not forget the Pretty Daisy Natalie will remind you! So with all this madness I am a full/part time college student depending on how crazy I feel that semester. I attend American Military University for my BS in Criminal Justice Forensics. It keeps me busy. So here I am with a extremely busy life and deciding...Hey I should blog...someone may want to read this madness! Enough with the intro, lets get to a real blog post!
Subscribe to:
Posts (Atom)


